| Home
| Newbies Guide | Technical Resources
| Lada Niva Clubs | Niva
Lift Kits | Gallery | Links
|
For approximately the last ten years I’ve been trying to find a locking differential for the rear of my Niva. Abortive attempts to obtain one from the USA (major manufacturer) resulted in the realisation that the Company involved had absolutely no intention of producing one, despite spouting a load of bull about how keen they were! So, in the end, I obtained a Russian LSD from Aussie Dave (when he was in Russia).
The LSD worked very well, transforming the ability of the Niva to maintain traction in adverse conditions. This was especially evident when a direct comparison could be made between mine and one with open diffs. You really didn’t know it was working, until you watched an ‘open’ vehicle (of any make!).
Despite this, I still occasionally
found myself sitting on an axle twister with one wheel spinning away, and no
forward movement, and the desire for a locker was still there.
Eventually, the Lada owners in Greece mentioned Michael, at Protrack, in Greece,
and I duly contacted him.
I would have preferred an auto locker, like the Detroit, but with that not being available, and on the recommendation of the Greek Lada owners, I ordered an air operated item from Michael.
It duly arrived a short while later. The first photo on his web site, and on Baxter’s, shows the bits and pieces that were sent over.

Click on image for larger view
A compressor, air tank, airline, and locker with all gears, bolts etc. enclosed in the casing. The compressor was fully wired up, requiring connection to positive and negative to start everything running. Ok, I still had to drill a hole in the bulkhead, run the wiring through, and find a location for the switches, but that’s not a problem.
What was a potential problem was that I had never assembled a diff before, and I was proposing to start on a unit that cost rather a lot, especially if I got it wrong and everything disintegrated!
The person who normally sorts out my diffs for me was not available to do the locker, but what I did have were two other fully assembled diffs with which I could compare my assembly efforts to get clearances etc. correct. I also had a friendly garage owner round the corner, who would give everything the once over before I stuck it all in the axle! At this point I should perhaps point out that I was working without any specialist tools. I had spanners, socket sets, allen keys, and a big hammer! But, that’s usually enough to get a job done on a Niva, and I usually work by feel and ear anyway! Oh, and threadlock – all bolts were treated to an application of this stuff prior to assembly. Better than having them come undone whilst in use!
The second and third photos on Michael’s and Baxter’s sites, clearly show how the finished diff goes together. I had watched and assisted my friend in previous assembly operations, so I wasn’t a total novice, and the bits and pieces went together easily. I was quite surprised.
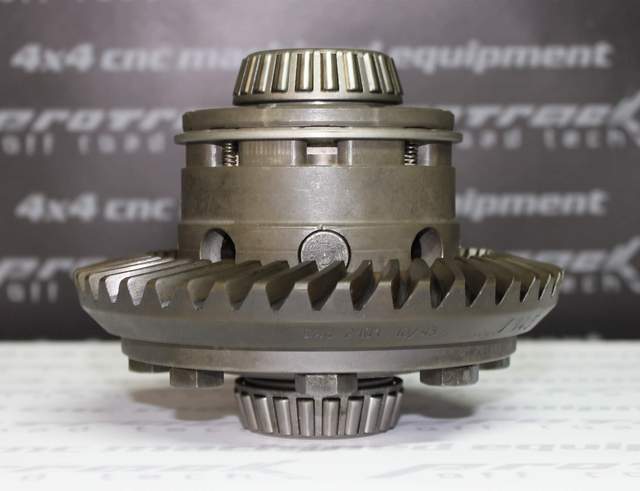
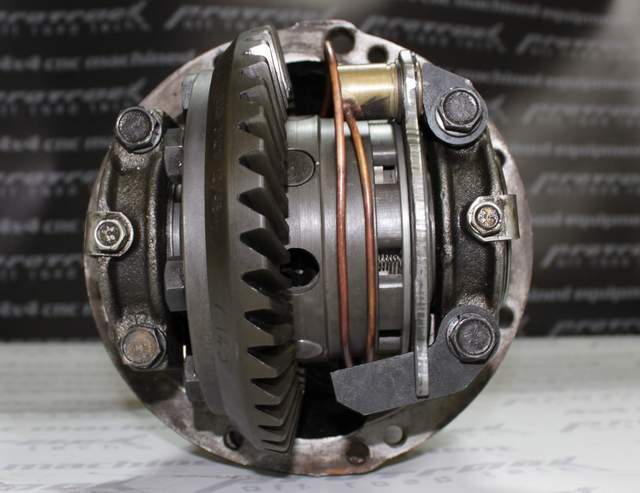
Click on images for larger view
Eventually, I was satisfied that the clearances on the locker assembly matched those on the other two diffs, and I took it to the garage round the corner. There, Dennis, the owner, had a good look at what I’d done, and pronounced himself satisfied. I then carted the thing back home and shoved it in the back of the Niva!
The placement and wiring in of the compressor and tank was a doddle, taking very little time. What took the longest was placing the two switches – there’s not a lot of spare room on the dash!! But, that was eventually done!
The one bit I got wrong was the exit of the copper air tube from the pumpkin. Looking at the joint provided, I had presumed that it fitted through a hole drilled in the housing and was secured by a lock nut on each side. So, I drilled the hole accordingly, then discovered that the hole was supposed to be tapped so the joint could be screwed into place! However, the hole I had drilled was too big!
So, I soldered the copper pipe into the joint, after sliding a short length of rubber fuel hose over the pipe. The hose then fitted tightly into the hole I had drilled, and I used a cable tie (zip tie) to seal it against the pipe, backed up with a dollop of silicone sealant to ensure water-tightness! The supplied airline then fitted to the joint in the normal way and everything was now ready for use.
Come to think of it, I’d have
had to do that anyway, as I don’t have any thread cutting taps!
There then followed two weeks of ordinary road driving – a couple of hundred miles of testing for noises etc. and of building my confidence in what I’d done. Then I took it to an off-road site for locker testing.
It handled quite severe axle twisters, hill climbs, rocks and boulders brilliantly. Traction was excellent and the hesitation and wheel spins I had experienced on this site in the past were non-existent. It just cruised calmly over the obstacles, engaging and disengaging easily, with no problems at all.
What I really like is that it is now easier to drive the Niva over this type of terrain than it has been in the past. The requirement of a right foot planted on the floor, while the vehicle bounces all over the place, is now a thing of the past. It effectively just goes where you point it (within reason, of course!). I’ve always preferred the gentle approach rather than things to the breeze. Not very photogenic, but that’s me! And I’d rather not break drive-shafts! And the test revealed no water ingress, so my pipe / hose securing method on the pumpkin had worked.
So, would I recommend this locker to other Niva owners? Definitely YES! It works very well and has a good, solid feel to it. And I’m very happy with the performance. Of course, only time will tell whether it will endure, but I have a feeling it will.
Also See:
LSD and Locker options for the Niva

| Home | Newbies Guide | Cloggy's DOHC | Lada Niva Clubs | Niva Lift Kits | Gallery | Links |
Please read the General Disclaimer near the bottom of this page